Tile Calculator
Flooring & wall tiling calculator • 2026 standards
Tile Calculation Formulas:
Show the calculator\( \text{Area} = \text{Length} \times \text{Width} \)
\( \text{Tiles Needed} = \frac{\text{Area}}{\text{Tile Area}} \times (1 + \text{Waste Factor}) \)
\( \text{Tile Area} = \text{Length} \times \text{Width} \)
\( \text{Grout Lines} = \frac{\text{Area}}{(\text{Tile Length} + \text{Grout Width}) \times (\text{Tile Width} + \text{Grout Width})} \)
\( \text{Grout Coverage} = \frac{\text{Area} \times \text{Grout Depth}}{27} \text{ (cubic yards)} \)
These formulas calculate the number of tiles needed for a given area, accounting for waste factors and grout lines. Tile area is calculated from individual tile dimensions, then the total area is divided by tile area to determine quantity needed.
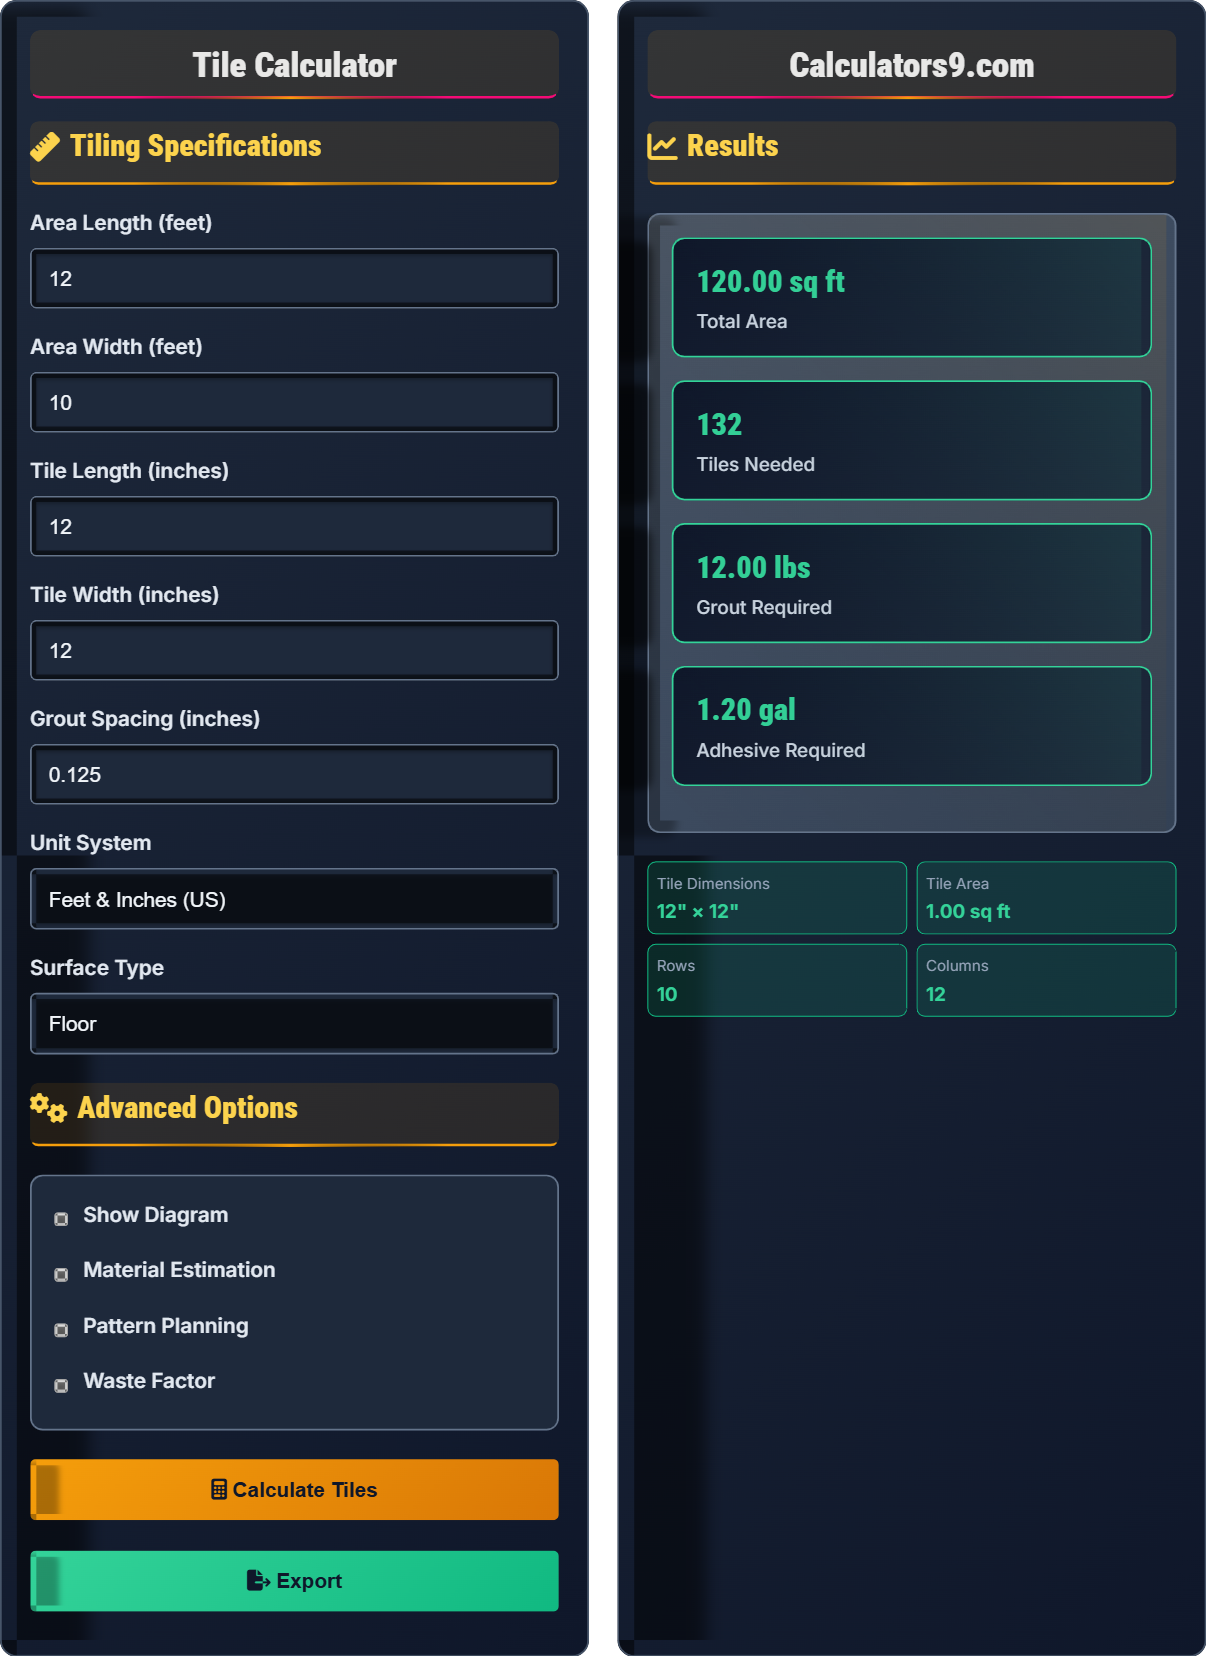
Example: For a 120 sq ft area with 12"×12" tiles (1 sq ft each):
Tiles Needed = 120 ÷ 1 = 120 tiles
With 10% waste factor: 120 × 1.1 = 132 tiles
For grout calculation with 1/8" joints and 1/4" depth:
Grout = (120 × 0.25) ÷ 27 = 1.11 cubic ft
Tiling Specifications
Advanced Options
Results
Tile Installation Fundamentals
Tile is a manufactured piece used to cover surfaces. Grout fills the gaps between tiles. Thinset is the adhesive used to bond tiles to surfaces. Proper planning ensures efficient material usage and professional results.
Key steps in tile installation:
- Surface preparation
- Layout planning
- Adhesive application
- Tile placement
- Grouting
- Sealing
- Plan layout before starting
- Allow for expansion joints
- Use appropriate thinset
- Apply grout properly
- Seal as needed
Tile Patterns
Popular tile patterns include straight, diagonal, herringbone, basket weave, and hexagon. Each pattern affects material usage and installation complexity.
Choosing patterns:
- Consider room size
- Evaluate skill level
- Assess material waste
- Plan cutting requirements
- Straight: Minimal waste
- Diagonal: 15% more waste
- Herringbone: 20% more waste
- Complex: Up to 25% waste
Tile Installation Learning Quiz
What is the area of a single tile that measures 12 inches by 18 inches?
The correct answer is A) 1.5 sq ft. First convert inches to feet: 12 inches = 1 foot, 18 inches = 1.5 feet. Then calculate area: 1 ft × 1.5 ft = 1.5 sq ft.
This calculation is fundamental to tile estimation. Understanding how to convert between inches and feet is essential, as tile dimensions are typically given in inches while area calculations are done in square feet. The area of a rectangle is always length times width.
Tile Area: The surface area of a single tile
Square Foot: Area of a square with sides of 1 foot
Conversion: Changing from one unit of measurement to another
• Convert all measurements to same unit first
• Area = Length × Width
• 12 inches = 1 foot
• Convert inches to feet by dividing by 12
• Multiply dimensions directly in inches, then divide by 144
• Use a calculator for complex conversions
• Forgetting to convert units
• Adding instead of multiplying dimensions
• Not accounting for grout lines
How many 12"×12" tiles are needed to cover an area of 150 square feet?
Step 1: Calculate the area of one tile
Each 12"×12" tile = 1 ft × 1 ft = 1 sq ft
Step 2: Calculate number of tiles needed
Tiles needed = Total area ÷ Tile area = 150 sq ft ÷ 1 sq ft = 150 tiles
Without waste factor, 150 tiles are needed to cover 150 square feet.
This calculation demonstrates the relationship between area and unit count. When tile size matches the unit of area measurement (1 sq ft tiles for sq ft area), the math becomes straightforward. This principle extends to other tile sizes as well.
Tile Count: The number of individual tiles needed for a project
Unit Area: The area covered by a single tile
Area Division: Dividing total area by unit area to find quantity
• Tiles needed = Total area ÷ Tile area
• Always add waste factor
• Round up to nearest whole tile
• Use 10% waste factor for standard installations
• Add more for complex patterns
• Buy extra for future repairs
• Not adding waste factor
• Forgetting to round up
• Not accounting for cuts and breaks
A contractor estimates needing 200 tiles for a backsplash. If the installation requires a 15% waste factor, how many tiles should be purchased?
Step 1: Calculate the waste amount
Waste = 200 tiles × 0.15 = 30 tiles
Step 2: Calculate total tiles needed
Total tiles = 200 + 30 = 230 tiles
Alternatively: Total tiles = 200 × 1.15 = 230 tiles
The contractor should purchase 230 tiles.
Waste factors account for broken tiles, cuts, and installation errors. They're particularly important for complex installations like backsplashes where cutting is frequent. The waste factor is added to the base quantity to ensure sufficient materials.
Waste Factor: Additional percentage added to base material quantity
Material Estimation: Calculating required quantities for a project
Installation Errors: Breakage, cutting mistakes, and fitting issues
• Waste factor = Base quantity × Percentage
• Total = Base + Waste
• Alternatively: Total = Base × (1 + Percentage)
• Standard waste: 10% for simple jobs
• Complex patterns: 15-20% waste
• Always round up to whole tiles
• Not adding waste factor
• Using wrong percentage
• Forgetting to round up
For a 100 sq ft area using 12"×12" tiles, calculate the number of tiles needed for a diagonal pattern. Diagonal patterns typically require 15% more tiles than straight patterns.
Step 1: Calculate base tile requirement
Base tiles = 100 sq ft ÷ 1 sq ft per tile = 100 tiles
Step 2: Calculate additional tiles for diagonal pattern
Additional = 100 × 0.15 = 15 tiles
Step 3: Calculate total tiles for diagonal pattern
Total = 100 + 15 = 115 tiles
For a diagonal pattern, 115 tiles are needed.
Diagonal patterns require more tiles because of the increased cutting and fitting needed at the edges. The pattern creates more waste as tiles need to be cut to fit at angles, resulting in unusable scraps. This is why pattern selection affects material requirements.
Diagonal Pattern: Tiles installed at 45-degree angle to room boundaries
Pattern Waste: Additional material needed due to cutting complexity
Installation Complexity: Difficulty level of tile pattern
• Diagonal = Base + 15% more
• Herringbone = Base + 20% more
• Straight = Base + 10% more
• Plan diagonal patterns carefully
• Use laser level for accuracy
• Buy extra tiles for complex patterns
• Not accounting for pattern waste
• Starting without proper layout
• Not using enough spacers
How much grout is typically needed per square foot of 12"×12" tiles with 1/8" grout lines?
The correct answer is A) 0.1 lbs per sq ft. For 12"×12" tiles with 1/8" grout lines, the typical grout consumption is approximately 0.1 pounds per square foot. This accounts for the small amount of grout needed to fill the narrow joints between tiles.
Grout consumption depends on tile size, grout joint width, and grout depth. Smaller joints and larger tiles require less grout per square foot. Understanding grout requirements helps in purchasing the correct amount and avoiding waste.
Grout Joint: The space between tiles filled with grout
Grout Consumption: Amount of grout needed per unit area
Joint Width: The thickness of the grout line
• Wider joints = more grout needed
• Smaller tiles = more joints = more grout
• Typical: 0.1-0.2 lbs per sq ft
• Check manufacturer's specifications
• Buy extra for touch-ups
• Consider sanded vs unsanded grout
• Underestimating grout needs
• Not considering joint width
• Using wrong grout type
FAQ
Q: How do I calculate the number of tiles needed for a diagonal pattern?
A: For diagonal patterns, you need approximately 15% more tiles than for straight patterns. This accounts for the increased waste from cutting tiles to fit at angles.
For example, if you need 100 tiles for a straight pattern:
Diagonal tiles = 100 × 1.15 = 115 tiles
The diagonal layout creates more cuts and waste, especially at the edges where tiles must be cut to fit the room's boundaries at 45-degree angles.
Q: What's the difference between sanded and unsanded grout?
A: The choice between sanded and unsanded grout depends on joint width:
- Unsanded grout: For joints 1/8" and narrower
- Sanded grout: For joints wider than 1/8"
Mathematically, if joint width is W:
If W ≤ 0.125", use unsanded
If W > 0.125", use sanded
Sanded grout has fine sand particles that provide strength and prevent shrinkage in wider joints, while unsanded grout is smoother and better for narrow joints.